Do you have a Raspberry Pi 1 lying around and don’t know what to do with it? While searching the internet, I came across DietPi, a Debian-based distribution highly optimized for memory usage, disk space, and CPU usage. It is designed for single-board computers (SBCs), such as all versions of the Raspberry Pi, among others (like Odroid, Pine64, Radxa, Allo, ASUS, NanoPi, OrangePi, ASUS Tinker), as well as miniPCs, virtual machines, and even regular PCs.
On the DietPi website, they showcase how optimized this Linux distribution is. You can check out a comparison with other SBCs and distributions here. Note! This comparison doesn’t claim that DietPi is better than other distributions, only that it is significantly lighter.
Another major advantage of this distribution is its extensive software selection, making installation extremely simple for users. You can check out the complete list of available software here.
After reading about all the benefits of DietPi, I had to try it on my Raspberry Pi 1 to see how well it performs.
Installing DietPi on a Raspberry Pi 1
The DietPi website provides a detailed installation guide, which you can check out here. However, here’s a quick summary of my experience and the steps I followed (it was really simple):
-
Choose and download the image that corresponds to your miniPC (in my case, the Raspberry Pi 1).
-
The downloaded file is not an .iso but a compressed archive. You need a program like 7zip to extract it easily.
-
Using Balena Etcher, flash the extracted image to the microSD card. After flashing the image, do not remove the microSD from your computer yet. Open the file explorer (if you’re using Windows) and look for the file
dietpi.txt. This file allows you to preconfigure DietPi, so it automatically applies settings on first boot.
I opened it with Notepad++ and made a few modifications:
AUTO_SETUP_LOCALE=es_ES.UTF-8 → Sets the regional locale.
AUTO_SETUP_KEYBOARD_LAYOUT=es → Configures the keyboard (useful for SSH connections).
AUTO_SETUP_TIMEZONE=Europe/Madrid → Sets the correct timezone.
AUTO_SETUP_NET_WIFI_COUNTRY_CODE=ES → (Optional) Defines the WiFi country code.
AUTO_SETUP_NET_USESTATIC=1 → Enables a static IP address instead of DHCP.
AUTO_SETUP_NET_STATIC_IP=192.168.0.100 → Sets a specific local IP for the Raspberry Pi.
AUTO_SETUP_NET_STATIC_MASK=255.255.255.0 → Configures the network mask (usually left unchanged).
AUTO_SETUP_NET_STATIC_GATEWAY=192.168.0.1 → Defines the router’s IP address.
AUTO_SETUP_NET_STATIC_DNS=9.9.9.9 149.112.112.112 → Uses Quad9 as the DNS provider (you can change this).
AUTO_SETUP_NET_HOSTNAME=DietPi → Sets the Raspberry Pi’s hostname on the network.
AUTO_SETUP_HEADLESS=1 → Disables HDMI output to save resources (since I’ll always use SSH).
AUTO_SETUP_AUTOMATED=1 → Enables an automated installation using the predefined dietpi.txt settings.
- After modifying dietpi.txt, I inserted the microSD into the Raspberry Pi, connected an Ethernet cable (it was easier than setting up a USB WiFi adapter), and powered it on.
I was confident that my configurations would work, so I didn’t connect a monitor or keyboard. I simply waited for it to appear on my network at the configured IP. At first, I thought something had gone wrong… but voilà! After about 2–3 minutes (yes, I’m impatient), it showed up on the network, and I connected via SSH.
Once connected, I could see the setup process in action. The system performed an initial apt-get update and asked a few questions:
-
Would I like to participate in anonymous statistics?
-
Would I like to change the root and dietpi user passwords? (A must for security!)
-
Should I keep the Raspberry Pi’s serial output enabled? (Useful for debugging, but if you don’t have a serial cable, it’s better to disable it to save resources.)
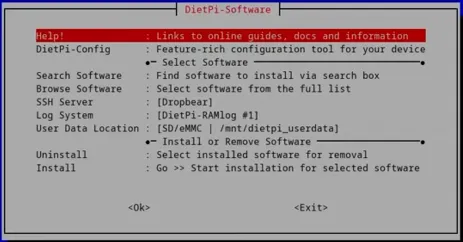
The most interesting part is the “Browse software” option, which provides a huge list of installable software.
At this point, I had DietPi up and running, but… what should I use it for? I started researching projects online, and recently, I’ve found Reddit to be an amazing resource—it’s full of useful ideas!
Here are some projects I found for a Raspberry Pi 1 running DietPi:
-
Pi-hole → A network-wide ad blocker that filters ads and tracking requests at the DNS level.
-
A child’s first computer → With a few tweaks and a friendly interface, it could be a great first PC for a kid.
-
A centralized print server → To connect old non-networked printers.
-
VPN server, Home Assistant, Retro gaming, or a Minecraft server → These options require more computing power (Raspberry Pi 3 or higher is recommended).
For now, I’ve decided to set up Pi-hole on my Raspberry Pi 1 to test how well it performs. Let’s see if it’s as good as people say!
That’s it for now! In my next post, I’ll walk you through the Pi-hole installation process, how I configured it, and how it works—so you can decide if it’s something worth trying. See you next time! 🚀